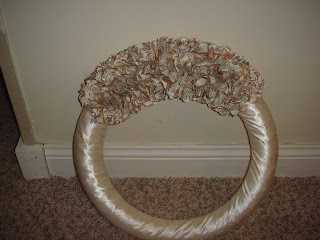
I got the idea for this wreath (Insert Picture of finished wreath)
somewhere on blog land. I know it is one of the blogs that I follow but I am not sure which one.
Anyway it was super easy and super cheap, but very (and I mean VERY) time consuming. This would be a good project if you were on a long car ride, or had some extra time to kill.
Here is the how-to for the paper wreath up-cycle.
Supplies to make the 'flowers:
Old dictionary style book (it needs to have the pages filled with words to look the best)
Box Cutter
Large Flower Punch
Brown Stamp ink (I had two different colors)
All you need to do is punch the flowers out of the book pages. I found I could get the most out of the pages if I cut them off of the binding with a box cutter.
Oh and a quick little tip for the punch. If it starts to freeze up, just take a piece of wax paper and pump the punch a few times. The wax paper will lubricate the sides of the punch and prevent it from sticking.
After all of the flowers were cut out, I 'swiped' just the edges in the ink. I tried to alternate between the two colors for a really antiqued look.
(Insert Picture)
Then I took a wreath that was given to me a few years ago at Christmas time. It got a little smashed in storage..as you can tell. It just looked like a lump of red.
I removed all of the plastic balls and flowers. Which left just the base.
I would have just bought a new Styrofoam wreath, but 1. I couldn't find one that wasn't ginormous and 2. they were like $10. I didn't want to spend anymore than I had already invested into this project. Which was $27 (and that included a new hot glue gun).
The cost break down will come later.
Back to the pictures.
After hot gluing it back together
I wrapped it with some off white satin binding. It was waaaay cheaper than ribbon.
I hot glued as I went to make sure that it was secure.
Much better. No?
Now it's time to attach those flowers!
Really the idea behind this thing is like what you would have done in grade school art class. You crinkle up a piece of paper and glue it really close to the last one, which give it that tufted look.
I found the easiest way to do this is to wrap the paper flower around the eraser of a pencil.
Then add a dab of hot glue, you really don't need much, then (with the paper still wrapped on the end of the pencil) stick it to the wreath.
This is what it will look like when you first start.
Then this is what it will look like after about three hours....yea, told you it took a very VERY long time.
Then this is what it will look like after about 9 hours worth of hot gluing....
(finished picture)
But it was totally worth it! I love the finished product. Of course you can use a lot less flowers than I did. But that's the look that I wanted.
Ok as far as cost goes....
Book: $1
Flower punch: $1 (bought on a garage sale)
Wreath: Free
Hot Glue Gun: $20 (but it can be used on other projects...so I won't really count the cost)
Box Cutter: Free, stolen from my mom's house
Ink: Free, also stolen from my mom's house
Satin Binding: Joann's for like $4
So total cost of this project (minus glue gun) was a whopping $6.
Yea, 9 hours was totally worth $6. :)


No comments:
Post a Comment